Liberty Mountain business analyst, Christian Weaver, shares a trip report from his recent "stroll" through Poe Canyon in Southern Utah.
The canyon has been in the works for 4-5 years and is what I would consider to be a bucket list canyon. The canyon is often described as one of the more technical canyons in the Colorado Plateau and any descriptions that you can find of the canyon often come with a page full of cautions and warnings.
Last year in the late spring my buddies and I attempted the canyon but failed to even reach it. Accessing the canyon requires a 6-mile cross desert approach to a nearby creek where a basecamp can be established. From the basecamp it's another 2-hour approach to the entry point of the canyon. Unfortunately, that week of the attempt we had an early heat wave with temperatures approaching triple digits coupled with a delayed mid-afternoon start due to a highway traffic jam causing a few members of the team to suffer heat exhaustion on the initial approach. Ultimately the decision was made to not do the canyon and to seek shade from the heat during the second day and retreat back to our cars in the cool of the evening. To make things even more interesting, my buddy gave birth to a lovely kidney stone on the hike out, making us grateful that we wisely chose to not attempt the canyon.
This year we decided to change up the calendar and attempt the canyon in the fall. Hoping for cooler temps, we chose the second weekend of October. This time we were blessed with perfect weather and no traffic. We started the approach late in the morning and got to the basecamp by late afternoon, half the time it took us the previous year.
 |
| A look at the sandstone slopes in which the slot canyon resides |
 |
| Entering the main creek on the initial approach to the basecamp. |
The next morning, we woke up at 5am and started the 2-hour approach to the entry point of the canyon. We hoped to enter the canyon right at sunrise so as to maximize our daylight. Even though the canyon is only a mile long we knew it would take us most of the day to get through. We made the first rappel into the canyon at 7am and immediately began to navigate through the labyrinth of obstacles.
 |
| Alpine Start |
 |
| Massive features of the canyon |
One of the major obstacles of the canyon is fact that there are not many bolts in the canyon, and placing new bolts is prohibited due to its geographic location. Without fixed anchors you have to get creative with what you rappel off of. For this canyon we utilized a special anchor called a sand trap (a releasable anchor that is filled with sand from the canyon itself). The procedure for using the sand trap is to send the heaviest team members first with a backup tied to another individual. As you observe the heavier canyoneers descend the rappel you can make the determination of whether or not there is enough sand in the anchor. If the anchor moves then you need to add more sand, if it does not move than you probably have enough sand in the anchor for the last (and lightest) person to rappel off of without the anchor being backed up. Once everyone is down the release cord is pulled which dumps the sand out of the trap and allows the anchor to pull over the edge of the cliff.
 |
| Matt starts his rappel with the sand trap in place |
 |
| The anchor starts moving while Mike is on rappel and everyone jumps on the backup (Brady) to prevent the anchor and him from going over the edge. We need more sand… |
 |
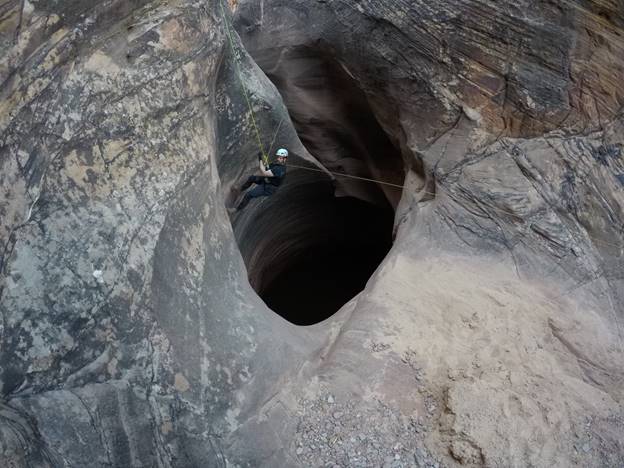
| Brady rappels off of a sand trap in to the arch room |
The water level determines the difficulty of the canyon. When the water is high you swim over many obstacles without any issues. When the water is low, keeper potholes (potholes that can be difficult to climb out of without proper equipment and know how) emerge, upping the difficulty of the canyon. When we descend the canyon there was very little to no water in the canyon itself putting it in what we call “Full-Keeper-Mode.”
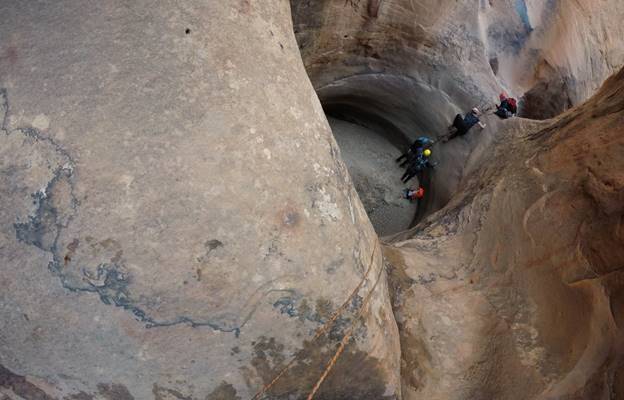
The canyon is known for its massive keeper potholes, the largest of these potholes is about 40 feet deep and 20 feet wide. This gigantic pothole has been known to take some teams most of a day to escape and has caused a few overnight bivies. We started off by throwing potshots (small canvas bags filled with sand from the canyon) across the pothole trying to wedge them back behind the lip of a “V” shaped slot 40+ feet away. If a potshot did not land in the right position we would have to pull the potshot back and try again. Sometimes it would take 8-10 attempts to get one potshot positioned just where we thought it needed to be in order to hold a climber. Just the process of throwing the potshots ate up an hour and a half of precious daylight. Once the potshots were in place, I rappelled into the pothole and attempted to climb out using the bundled-up strands of 6mm cord attached to the potshots. Unfortunately, not all the potshots had landed in the correct position and they failed to support my weight as I climbed, forcing me to retreat and ascend back up the rappel line that I had descended.
 |
| A look at the big keeper pothole |
Video of the big keeper pothole:
I spent almost 25 minutes treading water in the ice-cold pothole. The cold water had gotten to me and I had no desire to re-enter the pot to try again. Plan B was to attempt to bypass the pothole by hooking aid style through a series of small removable bolt holes that have been drilled 30 feet above the bottom of the canyon and then using a stick clip to reach a set of bolts from which you could then pendulum swing to the other side of the pothole from. 3 hours later we finally had everyone safely across.
 |
| Mike being assisted across the pothole |
With a 6-man team, progress is slow while waiting for everyone to rappel, so we split up into 2 teams and used two working ropes in the canyon. The first team sets up the rappels, rappels off and then takes the second rope and proceeds to the next rappel. The second team takes down the rope and then passes on that rope to the first team so they can continue to progress down the canyon.
 |
| Matt using the cord from a thrown potshot to climb out of another keeper pothole |
All together, we ended up spending 10-hours in the canyon, exiting right as the sun started to set. 13-hours from basecamp to basecamp. The canyon was the full experience and had a little bit of everything. Definitely worthy as a line item on my bucket list.
 |
| Mike working his way out of a keeper pothole |
 |
| Phil on rappel to by-pass the below keeper pot. |
Once we got back to our basecamp, we filtered some fresh water and hiked the long slog back to the car, arriving at the parking spot around 2:30am.
 |
| Final rappel out of the canyon just as the sun starts to set. |
Gear Used
CANYON ROPE 9.1MM X 200' ED Tough, durable and the Everdry coating makes a huge difference in weight you have to carry once it get wet.
KONG OKA MULTI DESCENDER With the ability to add friction on the fly when rappelling on skinny cords, this is my go-to descender.
TECNU SKIN CLEANSER SINGLES We ran into poison ivy at the bottom of the canyon and needed these to keep us from getting a rash. Life saver!
FIVE TEN GUIDE TENNIE My preferred canyon shoe. Lightweight and supportive for hiking but handles well on wet rock. No blisters, no lost toe nails.
BEAL HYDRO BAG Used this bag for the first time and I loved it. The PVC material did not get heavy when it got wet and was surprising comfortable for the approach into the canyon.
GRAVITYWORKS 4L FILTER SYSTEM My buddy brought this for the trip and I am sold. It filtered water quick and with little hassle. I will no longer pump my water.
____________
Share this article with a friend:


